7 Steps for the Perfect CDL Pre-Trip Inspection

The CDL pre-trip inspection is essential for driver safety and compliance. Knowing the inspection process and practicing it as a part of your driving routine can help make you a better driver. If you’re trying to get your CDL, the pre-trip inspection also impacts your ability to pass the test. Skipping steps or rushing through the inspection can lead to violations, accidents, and more.
Why Learn the CDL Pre-Trip Inspection?
The purpose of the CDL pre-trip inspection checklist is to help drivers identify problems with their rig before they begin driving. Under FMCSA pre-trip inspection requirements, the driver must be satisfied that the following parts are in good working order before driving a rig:
- Parking (hand) brake
- Service brakes, including trailer brake connections
- Lighting devices and reflectors
- Steering mechanism
- Horn
- Tires
- Rear-vision mirror or mirrors
- Windshield wiper or wipers
- Wheels and rims
- Coupling devices
- Emergency equipment
A successful pre-trip inspection can help you identify mechanical problems before you start your route. Additionally, the pre-trip inspection is a part of the CDL test. You must be familiar and comfortable with the pre-trip inspection before you can pass.
7 Steps for a Thorough CDL Pre-Trip Inspection
Below are seven steps for a semi-truck pre-trip inspection. These steps do not need to be followed in this order, but finding your own consistent routine will make each inspection easier than the last. Rearrange these steps to make the pre-trip inspection more logical for your processes and way of thinking. Most important is to ensure that your inspection meets the FMCSA’s requirements above.
1. Inspect Front Wheels and Brakes
Check the brake drum and lining for cracks or gouges. The brake air lines should be free of bulges and cuts. The clevis and cotter pin should be intact, and the slack adjuster should be at the correct angle to the brake chamber.
Check the tire pressure; tires typically require a PSI pressure of 100 to 120 and 4/32” tread depth. Look for cracks in the tires, and check the lug nuts for rust streaks, which could indicate looseness.
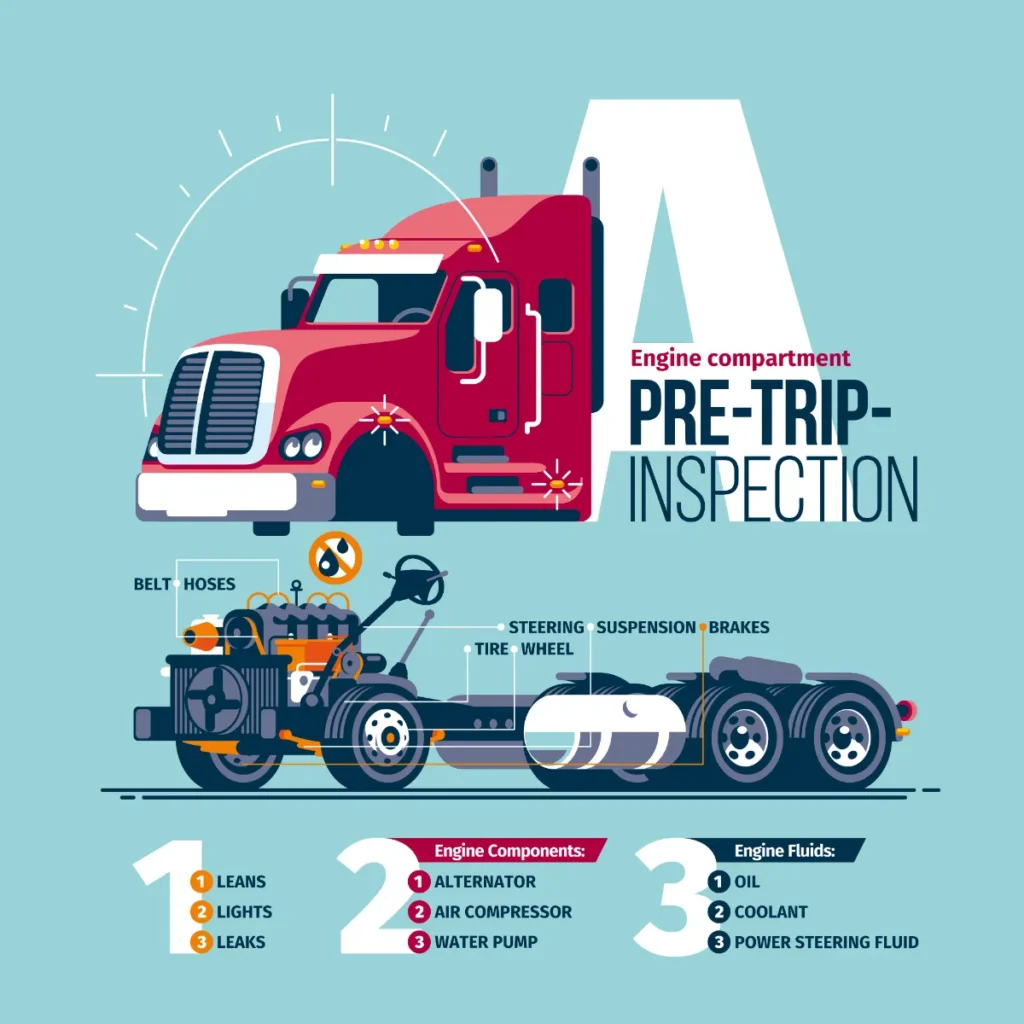
2. Check Passenger-Side Engine Components
Check the air filter housing to ensure it has a secure mount and cover without any cracks. Check the turbocharger for oil and exhaust leaks and the accessory drive belt for cracks, frays, abrasions, or cuts. The windshield washer fluid should be at least 75% full and should not have any leaks.
Inspect the accessory drive belt for cracks or frays, and the alternator for secure mounting and connections. The air conditioner compressor needs secure mounting as well. The engine air ductwork should be securely clamped.
3. Review Driver-Side Engine Components
Check the power steering fluid to ensure that it is appropriately topped off and not running too low. Inspect the steering gear box to confirm that it’s secure to the frame and not leaking. The fuel tank needs to have a sealed cap without any drips.
4. Inspect Suspension and Frame
Check the spring mounts for secure mounting (no cracks). The shock absorbers should be secure with no oil leaks, and the frame rails should appear straight without any unauthorized welds. The driveshaft should have no cracks, the universal joint should not be missing any bolts, and the airbag (bellows) should be fully inflated with secure mounting, with no ruptures.
5. Check Fifth Wheel and Trailer Connections
Check the kingpin to ensure it’s fully locked into the fifth wheel and the air lines have no cuts. The sliding tandem should have pins fully engaged. Slider lock pins should be fully engaged, and the pivot pin should feature a keeper pin and a cotter key intact.
Check the slider rail for broken welds and missing bolts, and the release arm should not be bent. The slider stop block welds should be unbroken, and the platform should be well-greased and tilted downward.
6. Inspect Trailer Body and Rear
Check that the doors and hinges are securely latched without damage, and all lights (brake, clearance, turn, tag lights) are functioning properly. The license plate should be properly illuminated and clean enough to read clearly.
Check the top rail of the trailer for cracks and collision damage. The trailer registration, PM sticker, and height sticker should be readable. Check the air line/glad hands for bulges and cuts, and the tracking device for cracks or collision damage. The placard holder should be intact, not missing rivets.
Check the bottom light for cracks and collision damage. Reflector tape should be clean, and side panels should not have cuts, holes, or missing rivets.
Check all latches on the rear of the trailer to ensure they’re secure and undamaged. The splash guard should be properly secured, and the bumper should be undamaged. Check the door hooks for missing bolts and door seals for cracks, separation, or damage.
7. Perform In-Cab Checks
Most oil gauges should show oil pressure between 25 and 50 PSI, and air pressure between 90 and 140 PSI. Check the emergency kit for triangles, spare fuses, and a fire extinguisher. Find the registration, permits, and ELD logs for your vehicle. Inspect the rear vision mirrors and windshield wipers. Test the horn.
Start the truck and perform an air-pressure build-up and leakage test. Don’t forget to perform in-motion brake tests once you’ve performed visual inspections of all brake components.
How Long Does a CDL Pre-Trip Inspection Take?
How long the CDL pre-trip inspection takes depends on the circumstances. Some companies will have a company policy that requires you to check certain components, which can add time to your process.
Many experienced drivers complete the inspection in about 15-20 minutes, although the type of vehicle and its mechanical complexity will impact how long it takes. The point of the inspection is not to do it quickly but to do it right, so don’t rush.
What Is the Best Way to Memorize a Pre-Trip Inspection?
There’s more than one way to learn how to remember the pre-trip inspection. The trick is to follow the same process every time, so you can reliably repeat your inspection without forgetting parts. Also, take it easy when completing an inspection, especially when you’re still learning the inspection process. Rushing can lead you to overlook steps, and that can turn into a habit.
Here are some suggestions that can help you memorize the CDL pre-trip inspection:
Use a Routine
Follow a front-to-back or top-to-bottom method that takes you smoothly and logically through the different areas of your truck.
Break It Into Sections
Break the truck into sections. For example, first check the engine compartment, then the cab, then do an outside walk-around, and finally end with a thorough brake check that inspects all brake components, including parking brake and trailer brake connections.
Tips for Memorizing the Inspection
- Practice daily on the same vehicle.
- Record yourself practicing the inspection and review it periodically (this is helpful if you’ve recently switched vehicles).
- Point to each component while naming it (this is helpful when practicing for the test).
- Walk through the process mentally, even when you’re away from the truck.
Make Your CDL Pre-Trip Inspection a Professional Habit
The CDL pre-trip inspection for Class-A drivers is more than an exercise for the CDL test; It’s an important professional habit that keeps you safe and compliant on the road. Developing a good habit of inspecting your rig can help you avoid accidents and costly breakdowns.
For more support in your truck driving career, join the team at Barr-Nunn Transportation. Contact us to learn more about opportunities for drivers seeking a successful career in truck driving.